🔋College Physics I – Introduction Unit 26 Review
26.4 Microscopes
26.4 Microscopes
Unit & Topic Study Guides
The Nature of Science and Physics
Kinematics
Two–Dimensional Kinematics
Force and Newton's Laws of Motion
Newton's Laws: Friction, Drag, and Elasticity
Circular Motion and Gravity
Work and Energy in Physics
Linear Momentum and Collisions
Statics and Torque
Rotational Motion & Angular Momentum
Fluid Statics
Fluid Dynamics: Biological & Medical Uses
Temperature and Gas Laws
Heat and Heat Transfer Methods
Thermodynamics
Oscillatory Motion and Waves
Physics of Hearing
Electric Charge and Fields
Electric Potential & Field
Electric Current, Resistance, and Ohm's Law
Circuits and DC Instruments
Magnetism
Electromagnetic Induction & AC Circuits
Electromagnetic Waves
Geometric Optics
Vision and Optical Instruments
Wave Optics
Special Relativity
Quantum Physics
Atomic Physics
Radioactivity and Nuclear Physics
Nuclear Physics in Medicine
Particle Physics
Microscopes
Microscopes extend human vision far beyond what the naked eye can resolve. In physics, they're a direct application of lens optics: by combining lenses (or using electron beams), microscopes produce magnified images of tiny specimens. This section covers how compound microscopes work, how to calculate their magnification, and how different microscope types compare.
Components of compound microscopes
A compound microscope uses two lens systems in sequence to magnify a specimen. Each component plays a specific role in producing a clear, magnified image.
- Objective lens: Positioned close to the specimen, this lens provides the initial magnification. Common objective magnifications are 4x, 10x, 40x, and 100x.
- Eyepiece (ocular lens): Located at the top where you look through, this lens further magnifies the image produced by the objective. Most eyepieces are 10x.
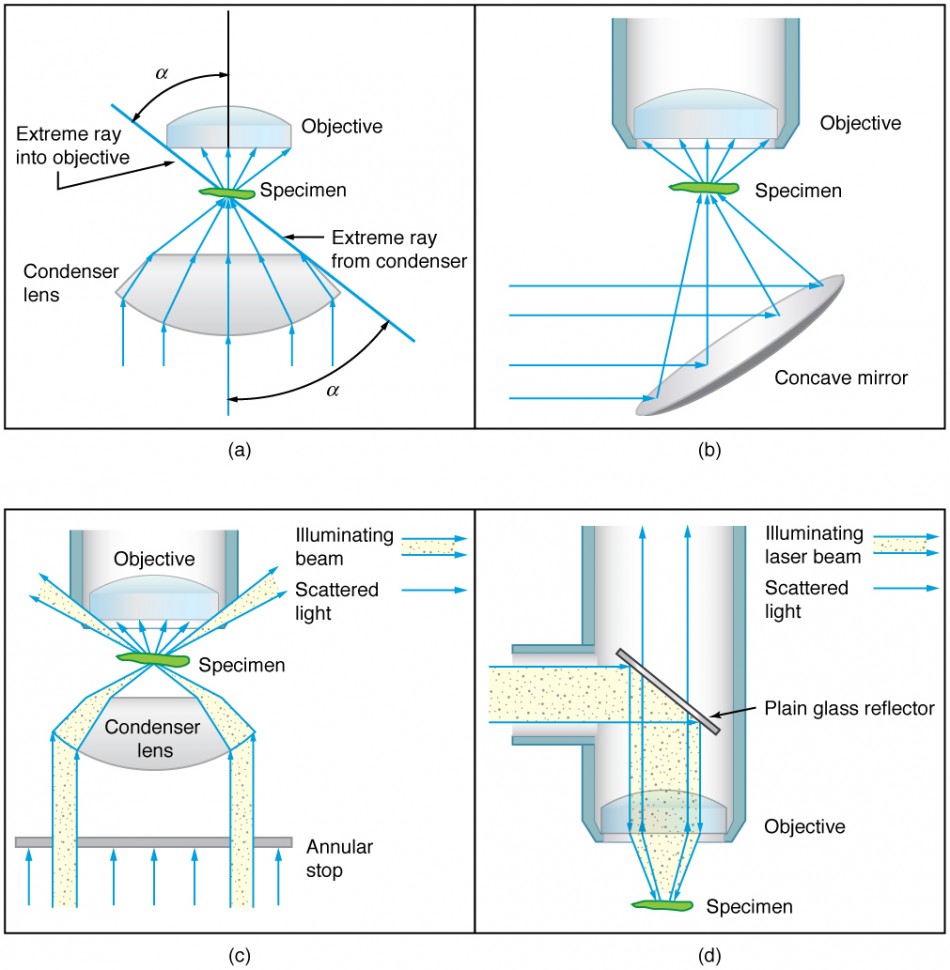
- Illumination system: A light source (LED or halogen lamp) shines light through the specimen, and a condenser lens focuses that light onto the specimen for even illumination.
- Stage: The flat platform where you place the specimen slide. A mechanical stage has knobs that let you move the slide in small, precise increments.
- Focus knobs: The coarse focus knob makes large adjustments to bring the specimen roughly into view. The fine focus knob makes small adjustments to sharpen the image. Fine focus is especially important at high magnifications, where the depth of field (the range of distances that appear in focus) is very narrow.

Calculation of microscope magnification
Total magnification in a compound microscope is the product of the two lens magnifications:
For example, if you're using a 40x objective and a 10x eyepiece:
This means the specimen appears 400 times larger than its actual size.
One thing to keep in mind: higher magnification doesn't automatically mean a better image. The numerical aperture (NA) of the objective lens determines how much light the lens can gather and, in turn, sets the limit on useful magnification. Pushing magnification beyond what the NA supports just enlarges a blurry image without revealing more detail. The maximum useful magnification is roughly .
Types of microscopes compared
Different microscopes use different physics to form images, and each type has trade-offs in magnification, resolution, and the kind of specimens it can handle.
Optical (light) microscopes use visible light and glass lenses:
- Compound microscopes (described above) are the standard lab microscope for viewing thin, prepared specimens at magnifications up to about 1000x.
- Stereo microscopes (dissecting microscopes) use two separate optical paths, one for each eye, to produce a three-dimensional view. They work at lower magnifications (typically up to about 100x) and are useful for examining larger specimens like insects or mineral samples.
Electron microscopes replace light with a beam of electrons. Because electrons have much shorter wavelengths than visible light, these microscopes achieve far higher resolution.
- Transmission Electron Microscope (TEM): Electrons pass through an ultra-thin specimen, producing a detailed two-dimensional image. Magnifications can reach up to about 1,000,000x.
- Scanning Electron Microscope (SEM): An electron beam scans across the surface of a specimen, and the detected signals build a three-dimensional surface image. Magnifications reach up to about 500,000x.
Scanning probe microscopes don't use light or electrons at all. Instead, a physical probe scans across the specimen surface.
- Atomic Force Microscope (AFM): A tiny tip on a flexible cantilever traces the surface, measuring forces between the tip and the specimen. This maps surface topography with atomic-scale resolution.
- Scanning Tunneling Microscope (STM): A conductive tip is brought extremely close to a conductive surface. A quantum mechanical tunneling current flows between the tip and surface, and changes in that current map the electronic structure of the surface at atomic resolution.
Advanced microscopy techniques
Standard optical microscopes struggle with transparent specimens and are limited in resolution by the diffraction of light. Several techniques address these challenges.
- Phase contrast microscopy: Many biological specimens are nearly transparent under normal illumination. This technique converts tiny phase shifts in light (caused by differences in specimen thickness or refractive index) into visible brightness differences. The result is a high-contrast image without needing to stain the specimen.
- Fluorescence microscopy: Specific molecules in the specimen (either natural or added as dyes) absorb light at one wavelength and emit it at a longer wavelength. By filtering out everything except the emitted fluorescent light, you can visualize particular structures or molecules with high specificity.
- High-resolution techniques: The diffraction limit of visible light restricts optical resolution to roughly 200 nm. Techniques such as confocal microscopy and super-resolution methods work to push past this barrier, reducing the effects of aberrations and out-of-focus light to achieve finer detail.