💏Intro to Chemistry Unit 4 Review
4.5 Quantitative Chemical Analysis
4.5 Quantitative Chemical Analysis
Unit & Topic Study Guides
Essential Ideas
Atoms, Molecules, and Ions
Substances and Solutions Composition
Stoichiometry of Chemical Reactions
Thermochemistry
Electronic Structure and Periodic Properties
Chemical Bonds and Molecular Structure
Advanced Theories of Covalent Bonding
Gases
Liquids and Solids
Solutions and Colloids
Kinetics
Fundamental Equilibrium Concepts
Acid–Base Equilibria
Equilibria of Other Reaction Classes
Thermodynamics
Electrochemistry
Representative Elements: Metals to Nonmetals
Transition Metals & Coordination Compounds
Organic Chemistry
Quantitative Chemical Analysis
Quantitative chemical analysis focuses on determining exactly how much of a substance is present in a sample. This is where stoichiometry meets real lab work: you use balanced equations and precise measurements to calculate unknown concentrations or masses.
The two classical methods are titration (measuring volumes of reacting solutions) and gravimetric analysis (measuring the mass of a product). This section also covers combustion analysis and a few instrumental techniques.
Principles of Titration and Gravimetry
Titration is the gradual addition of a solution with a known concentration (called the titrant) to a solution with an unknown concentration (called the analyte). You keep adding titrant until the reaction is complete.
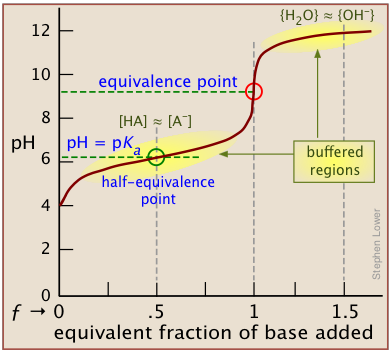
- The equivalence point is the theoretical moment when the moles of titrant are stoichiometrically equal to the moles of analyte.
- The endpoint is the observable signal that tells you the reaction is complete. This is usually a color change from an indicator like phenolphthalein, but it can also be a change in conductivity or pH.
- The endpoint and equivalence point are close but not always identical. A well-chosen indicator makes them nearly the same.
Gravimetric analysis determines how much analyte is in a sample by converting it into a compound of known composition and then weighing that compound.
- React the analyte with a reagent that forms an insoluble precipitate (for example, adding silver nitrate to a chloride solution produces silver chloride).
- Filter the mixture to isolate the precipitate.
- Wash and dry the precipitate to remove impurities.
- Weigh the dried precipitate and use stoichiometric relationships to calculate the mass or concentration of the original analyte.
Calculations from Titration Data
Titration math relies on a simple idea: at the equivalence point, the moles of titrant and analyte are related by the stoichiometry of the balanced equation.
Molarity () is the concentration of a solution in moles of solute per liter of solution. For a 1:1 reaction, the key relationship is:
where and are the molarity and volume of the titrant, and and are the molarity and volume of the analyte.
Watch out: only works directly when the mole ratio between titrant and analyte is 1:1. If the balanced equation has a different ratio (like 2:1), you need to account for that. For example, if 2 moles of NaOH react with 1 mole of , then does not apply as a simple . Instead, calculate moles of titrant first, then use the mole ratio.
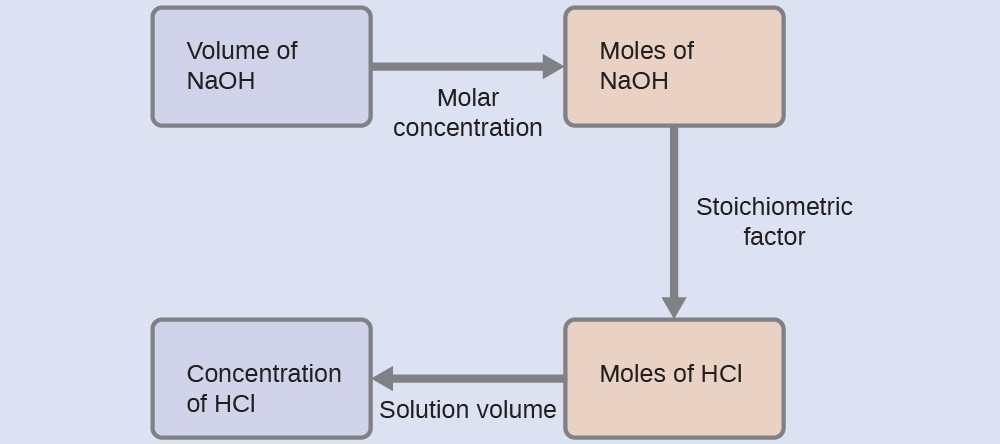
Step-by-step titration calculation:
- Record the volume of titrant used to reach the endpoint ().
- Calculate moles of titrant: (make sure volume is in liters).
- Use the mole ratio from the balanced equation to find moles of analyte.
- Divide moles of analyte by the volume of the analyte solution (in liters) to get .
Gravimetric analysis calculations follow a similar logic:
- Determine the molar mass of the precipitate formed.
- Divide the measured mass of the precipitate by its molar mass to get moles of precipitate.
- Use the stoichiometric ratio between the precipitate and the analyte to find moles of analyte.
- If you need concentration, divide moles of analyte by the sample volume (in liters).
Stoichiometry in Combustion Analysis
Combustion analysis is used to determine the elemental composition of a compound, especially organic compounds containing carbon and hydrogen. The sample is burned in excess oxygen, and the combustion products are collected and weighed.
- Carbon in the sample is converted to .
- Hydrogen is converted to .
- Other elements form their respective oxides (for example, sulfur produces ).
How to determine elemental composition from combustion data:
- Measure the masses of and produced.
- Calculate moles of each product using their molar masses ( = 44.01 g/mol, = 18.02 g/mol).
- Each mole of contains 1 mole of carbon. Each mole of contains 2 moles of hydrogen. Use this to find moles of C and H.
- Convert moles of each element to mass (multiply by atomic mass).
- If the compound contains oxygen, subtract the masses of C and H from the total sample mass to find the mass of O.
- Express results as mass percentages or convert to an empirical formula by finding the simplest whole-number mole ratio.
For example, if combustion of a sample yields masses that correspond to 40% C, 6.7% H, and 53.3% O, converting to moles and simplifying gives the empirical formula .
Instrumental Methods of Analysis
Beyond classical titration and gravimetry, chemists use instruments to measure concentrations more quickly or for trace amounts.
- Spectrophotometry measures how much light a sample absorbs at a specific wavelength. A calibration curve (a graph of absorbance vs. known concentrations) lets you read off the concentration of an unknown sample. This works because absorbance is proportional to concentration for dilute solutions.
- Atomic absorption spectroscopy (AAS) measures the concentration of specific metal elements. Atoms absorb light at characteristic wavelengths, so by measuring how much light is absorbed, you can determine how much of that metal is present.
- Chromatography separates complex mixtures into individual components based on how strongly each component interacts with a stationary phase versus a mobile phase. It's more of a separation technique than a direct measurement, but it's often paired with a detector to quantify each component.
- Standard addition is a technique where known amounts of the analyte are added (spiked) into the sample itself. By comparing the response before and after spiking, you can account for matrix effects that might throw off a normal calibration curve.