Fiveable
🎡AP Physics 1
​

🎡AP Physics 1

FRQ 4 – Qualitative/Quantitative Translation
​
Unit 1: Kinematics
​
FRQ Types & Units

Each FRQ type tests specific skills taught in particular units. Here's why certain units appear for each question type:

This mapping reflects College Board's exam structure - each FRQ type tests specific skills that are taught in particular units.

Practice FRQ 1 of 201/20

4. In Scenario 1, a student standing on the ground throws a ball horizontally with an initial speed of v₀ = 8.0 m/s from a height of h = 2.0 m above the ground, as shown in Figure 1. The ball lands on the ground a horizontal distance d₁ from the point directly below where it was released. Air resistance is negligible.

Figure 1. Ball thrown horizontally

Single-panel physics diagram (no graph) of a horizontal projectile launch.

Overall layout:
- Draw a single straight ground line across the full width of the panel near the bottom edge. Label this line "Ground" centered beneath it.
- Above the ground line, place a student on the left side of the panel, standing upright on the ground.

Release point and height marking (must be unambiguous):
- Mark the ball’s release point as a small solid black dot located to the right of the student’s torso, at about the student’s chest height.
- Directly below the release dot, on the ground line, mark a reference point with a small solid black dot. This is the point on the ground "directly below" the release.
- Draw a vertical dashed line from the release dot straight down to the reference dot on the ground, showing perfect vertical alignment.
- Next to this vertical dashed line, draw a vertical double-headed measurement arrow whose top endpoint is level with the release dot and whose bottom endpoint touches the ground line.
- Label this vertical measurement arrow exactly "h = 2.0 m" with the text placed beside the arrow, centered vertically.

Initial velocity of the ball (must be perfectly horizontal):
- From the release dot, draw a straight horizontal arrow pointing to the right (no upward or downward tilt). The arrow must start exactly at the release dot.
- Label this arrow exactly "v₀ = 8.0 m/s" placed just above the arrow shaft.

Flight and landing depiction:
- Show the ball’s trajectory as a smooth dashed curve starting at the release dot and curving downward toward the ground line (parabolic shape opening downward).
- Mark the landing point as a small solid black dot located on the ground line to the right of the vertical dashed drop line.
- Ensure the dashed trajectory ends exactly at the landing dot on the ground line.

Horizontal distance d₁ (exact endpoints and alignment):
- On the ground line, draw a horizontal double-headed measurement arrow from the reference dot (directly below the release) to the landing dot.
- The measurement arrow must lie directly on top of (or immediately above) the ground line, with its left arrowhead exactly at the reference dot and its right arrowhead exactly at the landing dot.
- Label this measurement arrow exactly "d₁" centered above the arrow.

Text/labels present in the image (exact):
- "Ground"
- "h = 2.0 m"
- "v₀ = 8.0 m/s"
- "d₁"

Styling constraints:
- Use solid lines for ground and velocity arrow, dashed lines for the vertical drop line and the projectile trajectory.
- No grid, no axes, no extra numbers beyond those listed.

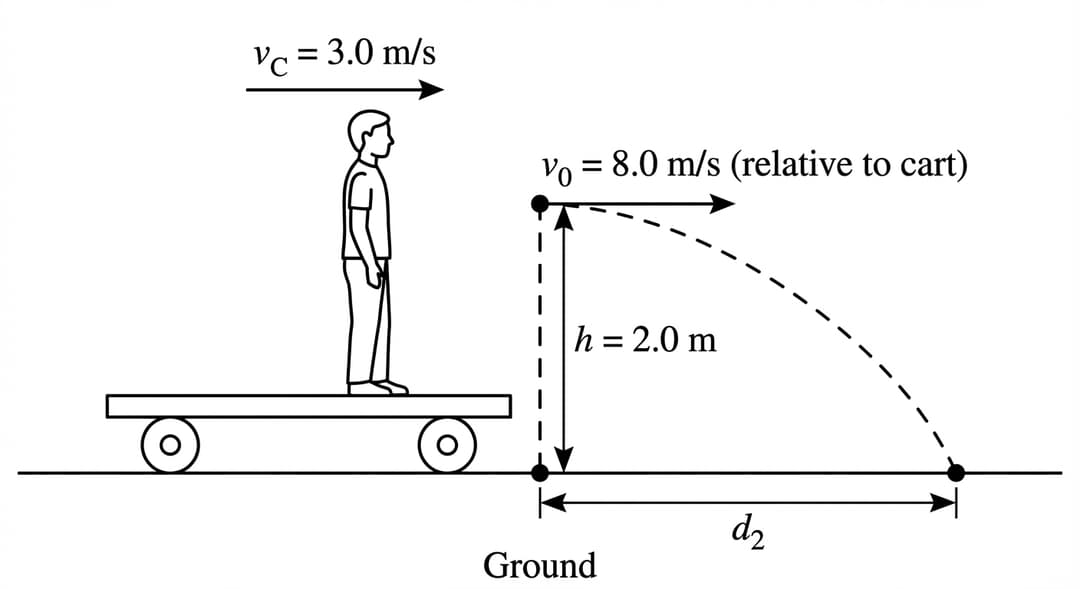
Figure 2. Cart and ball motion

Single-panel physics diagram (no graph) of a horizontal projectile launch from a moving cart.

Overall layout:
- Draw a single straight ground line across the full width of the panel near the bottom edge. Label this line "Ground" centered beneath it.
- Place a flatbed cart resting on the ground line in the left half of the panel. The cart is a low rectangle with two visible wheels touching the ground line.
- Draw a student standing upright on top of the cart bed, positioned near the cart’s center.

Cart motion (must be clearly separate from the throw speed):
- Draw a straight horizontal arrow pointing to the right above the cart (or attached to the cart body) to indicate cart velocity.
- Label this cart-velocity arrow exactly "vᴄ = 3.0 m/s" placed just above the arrow shaft.

Release point and height marking (must match Scenario 1 height exactly):
- Mark the ball’s release point as a small solid black dot located to the right of the student’s torso, at about the student’s chest height (above the cart bed).
- Directly below the release dot, on the ground line (not on the cart), mark a reference point with a small solid black dot. This is the point on the ground "directly below" the release at the instant of release.
- Draw a vertical dashed line from the release dot straight down to the ground reference dot, showing perfect vertical alignment.
- Next to this vertical dashed line, draw a vertical double-headed measurement arrow with top endpoint level with the release dot and bottom endpoint touching the ground line.
- Label this vertical measurement arrow exactly "h = 2.0 m" with the text placed beside the arrow, centered vertically.

Throw speed relative to the cart (must be labeled as relative-to-cart):
- From the release dot, draw a straight horizontal arrow pointing to the right (no upward or downward tilt). The arrow must start exactly at the release dot.
- Label this arrow exactly "v₀ = 8.0 m/s (relative to cart)" placed just above the arrow shaft.

Flight and landing depiction:
- Show the ball’s trajectory as a smooth dashed curve starting at the release dot and curving downward to the ground line (parabolic shape opening downward).
- Mark the landing point as a small solid black dot located on the ground line to the right of the vertical dashed drop line.
- Ensure the dashed trajectory ends exactly at the landing dot on the ground line.

Horizontal distance d₂ (exact endpoints and alignment):
- On the ground line, draw a horizontal double-headed measurement arrow from the ground reference dot (directly below the release) to the landing dot.
- The measurement arrow must lie directly on top of (or immediately above) the ground line, with its left arrowhead exactly at the ground reference dot and its right arrowhead exactly at the landing dot.
- Label this measurement arrow exactly "d₂" centered above the arrow.

Text/labels present in the image (exact):
- "Ground"
- "vᴄ = 3.0 m/s"
- "h = 2.0 m"
- "v₀ = 8.0 m/s (relative to cart)"
- "d₂"

Styling constraints:
- Use solid lines for ground and velocity arrows, dashed lines for the vertical drop line and projectile trajectory.
- Keep the ground line visually identical to Figure 1’s ground line style to emphasize same reference frame.
- No grid, no axes, no extra numbers beyond those listed.
A.

Indicate whether d₁ is greater than, less than, or equal to d₂ by writing one of the following in your answer booklet.

• d₁ > d₂
• d₁ < d₂
• d₁ = d₂

Justify your answer in terms of ALL components of the ball's motion as observed from the ground reference frame in each scenario (see Figure 1 and Figure 2). Use qualitative reasoning beyond referencing equations.

B.

Starting with kinematic principles, derive an expression for the horizontal distance d the ball travels before landing on the ground. Express your answer in terms of vₓ, h, and physical constants, as appropriate. Begin your derivation by writing a fundamental physics principle or an equation from the reference information. Consider the general case where a ball is thrown horizontally with an initial horizontal velocity component vₓ from a height h above the ground.

C.

Indicate whether the expression for the distance d you derived in part B is or is not consistent with the claim made in part A. Briefly justify your answer by referencing your derivation in part B and the relationship between the horizontal velocity components in the two scenarios as observed from the ground reference frame.


Pep

essential ap study content awaits..

Features
Testimonials
Testimonials
start studying →
FRQ Directions
Free Response Question Practice

This practice environment simulates the AP AP Physics 1 Free Response Questions section. Here are some guidelines:

  • Read each question carefullybefore responding. Pay attention to command verbs like "identify," "explain," "analyze," or "evaluate."
  • Use the timer to practice time management. You can pause, restart, or hide the timer as needed.
  • Mark for Review if you want to come back to a question later.
  • Your responses are saved automatically as you type. You can also use the drawing tool for questions that require diagrams or graphs.
  • Use the toolbar for formatting options like bold, italic, subscript, and superscript.
  • Navigate between questions using the Previous and Next buttons at the bottom of the screen.

Tip: Answer all parts of each question. Partial credit is often available, so even if you are unsure, provide what you know.